The standard page is a fixed, 2 column layout template with built in features including Listen (Text to Talk), Download to PDF, Print this page and Share this page. This template is used for most standard content on nsw.gov.au.
On this page
- Using standard pages
- Create a new standard page
- Set navigation on standard pages
- Adding blocks on a standard page
- Save a standard page
- See live standard pages
Using standard pages
Do
- Use the standard page for quick and easy content builds using the layout and blocks available in the template.
- The most common block used on the standard page is the Block / WYSIWYG editor.
- You should always clean your text using Notepad or other text editor before cutting and pasting it into the WYSIWYG.
- Cutting and pasting from Word documents or emails can import disruptive HTML like line heights and <span> code which affects accessibility for the audience who use screen readers and other assistive technologies.
- You should always clean your text using Notepad or other text editor before cutting and pasting it into the WYSIWYG.
- The standard template is a 2 column page layout with a two-third width column on the left and a one-third width column on the right.
- Content should only be placed in the left column.
- The right column is reserved for optional side navigation.
- The page title should accurately describes the content of the page – maximum of 50 characters.
- The title displays as the H1 heading for the page and is the default meta title for SEO (Search Engine Optimisation).
- The page summary should be a maximum of 160 characters.
- Avoid any special formatting like bold in the summary field and don't add hyperlinks to this field.
- The summary is also the default meta description for SEO.
- Do include the In-page navigation for content that has more than 2 sections.
- Include side-navigation to help the audience to quickly go to related pages within a section.
Don't
- Don't make the content too long. Be mindful of the audience experience when using mobile devices to access the content.
- If there are more than 10 links in the in-page navigation, consider whether it is better to:
- reduce the page content
- split the content across multiple pages.
- If there are more than 10 links in the in-page navigation, consider whether it is better to:
Create a new standard page
Follow the steps below to create a new standard page for your site.
- Login to the CMS, then navigate to Manage > Content
- Click on the '+Add content' button
- Select 'Standard Page' from the list of content types available for you to create
- Select 'Standard page: default', then click 'Submit'
Mandatory page set up fields
Fill in the required fields for each tab.
Title: the title of the page
- Use sentence case unless brand names or proper names are in use. No special characters.
- Try to aim for a maximum of 50 characters.
- The page title forms the end of the URL and appears in the breadcrumb and side navigation.
- The title displays as the H1 heading for the page and is the default meta title for SEO (Search Engine Optimisation). Learn more on the importance of page title (meta title) for SEO.
Summary: introduction to the page
- The page summary will appear under the page title on the web page.
- Try to keep it less than 170 characters in length.
- The summary is also the default meta description for SEO.
- The meta description is a brief summary of the content on the web page that appears below the page title in search results.
- It can influence click-through rates (CTR) from search results to your web page.
- A well-crafted meta description can entice users to click through to your page by providing a concise summary of the content, include relevant keywords, and highlighting the benefits of visiting your page.
Short Title (optional): a shorter version of the Title if it is lengthy.
- Use the short title field if you want to shorten your page title for Side Navigation and Breadcrumbs to prevent text wrapping for long page titles. Use sentence case. If no URL Slug is used, the short title will also modify the URL. Learn more about short titles.
URL Slug (optional): modifies the last part of the page URL
- You can use the URL slug field to modify the end part of your URL. Use the URL slug to create a shorter, SEO-friendly URL and prevent duplication of words.
- The URL slug will override the URL that is automatically generated from the page title.
- The URL slug:
- must be lowercase
- must separate words with a - (hyphen)
- should include the page's primary keyword
- should not exceed 32 characters.
The media tab is only used when the standard page forms part of another component, for example, listings.
Agency: select which Agency owns the page from the dropdown list
- You can choose more than one agency however, the first Agency listed will be the main agency for the content and will receive the Google Analytics data for the page.
Audience: select 1 or more audience types, that your content is relevant for.
Topic: select which topic/s best applies for the standard page
- You must select at least 1 of the 20 main Topic tags, that is relevant to your content.
- The list of main topics can be found on the homepage.
Notes:
- Discuss with your team what tagging may be required if you are planning on creating lists with your pages.
- Tags are only used to group related content together and do not play a part in SEO.
Parent: select the Parent page for the landing page.
- Start to type the title for the nominated Parent page for your new web page.
- The Parent you select will determine the URL structure and breadcrumb navigation at the top of the page.
Go to the Right hand side page menu > Governance > Editorial group.
Select the Editorial group/s that will be responsible for keeping this new web page updated. You can choose more than one group.
Set navigation on standard pages
On the right-hand side, expand the Advanced settings accordion.
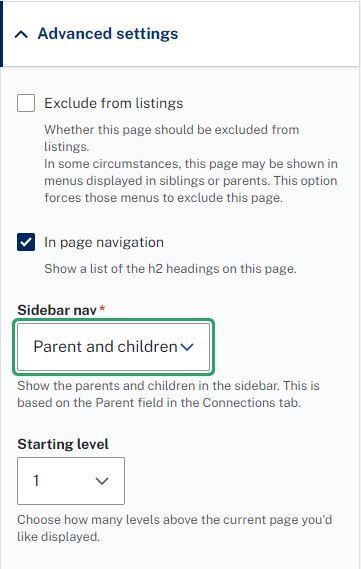
- Do include the In-page navigation for content that has more than 2 sections,
- The in-page nav listing is automatically created based on the H2 headings on the page.
- The in-page nav should be placed at the top of content pages under the title and summary and any callouts.
- By default, the in-page nav is included when you create a new page. You have the option to exclude the in-page nav.
- Do include side-navigation (Sidebar nav) on your page. This appears in the right hand column.
- The standard side-navigation setting is 'Parent and children, 1 level up'.
- Exclude from listings will hide the page from side-navigation.
- Navigation settings are found in Advanced settings in the right hand page set up menu.
Easy Read pages can now be linked to standard pages
You can now link Easy Read pages to standard pages in the CMS. When a standard page has an Easy Read version, it will be displayed as a clickable link in a call out component on that page. For instructions on how to link Easy Read pages to standard pages, refer to the Creating an Easy Read page guide.
Adding blocks on a standard page
On the Content tab, click on 'Add Block' if a new content block is required.
Clicking on the dropdown arrow next to 'Add Block' reveals a dropdown list of additional components that can be added on the page
Head over to Available components for Standard pages for a list of standard page components available
Save a standard page
Once finished, click on Save on the bottom of the page. Leave 'Save as:' as 'Pre-published Draft'
The preview of the page in draft will now be displayed.
Tip: when working on standard pages, it is best to work in blocks of content. Eg, on the first content block, add in the H2 heading and the content underneath that heading, and use an additional content block for the next H2 heading and its content
Live agency examples
The standard page is the most commonly used page type and there are many design variations that agencies have created. See some live standard page examples from different agencies:
- What to do when you've retired
- Applying for a commemorative marriage certificate
- Women's Financial Toolkit - Planning for the future
- Air quality in NSW
- Young people in custody
- Temporary and emergency housing
- Nursing careers
Need any more help?
If you have any questions, or require assistance with anything mentioned in this article, submit a request via the webform.